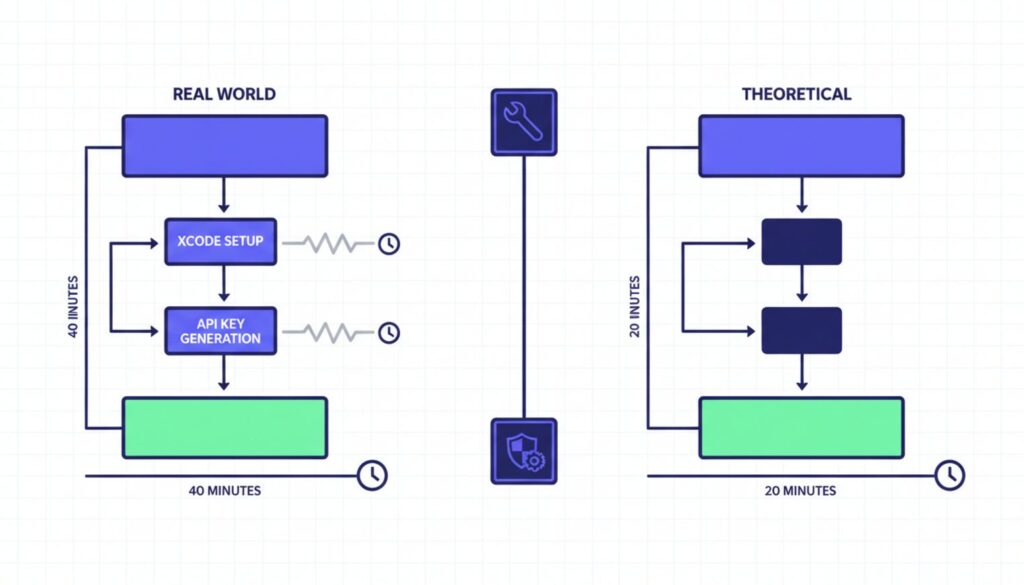
Marketed as a seamless 20-minute installation, deploying a production-ready OpenClaw environment actually takes beginners closer to 40 minutes once hidden prerequisites and vital API configurations are factored in. The gap between the quick-start convenience of the default auto-installer and a truly resilient, automated framework is exactly where early adopters get burned by exposed ports and failed dependencies.
By the end of this walkthrough, you will have a hardened, 24/7 capable AI agent that genuinely saves you hours of manual task execution instead of creating new maintenance headaches. You’ll secure localhost bindings, map Telegram and Google Workspace integrations, and deploy via VPS with Docker for continuous uptime. The difference between a local install that crashes when your laptop sleeps and a VPS deployment that handles 150 hours of background tasks is the focus of this guide.
What You’ll Achieve With This OpenClaw Setup Guide
By completing this tutorial, you’ll build three distinct capabilities:
- A hardened OpenClaw environment with localhost-only access and Docker read-only modes that prevent unauthorized network exposure
- Telegram and Google Workspace integrations mapped for remote execution without terminal access
- 24/7 uptime via VPS deployment, turning reactive chat sessions into proactive automation that runs scheduled tasks indefinitely
The official documentation promises simplicity. Reality delivers complexity in three specific areas: Mac-specific dependency failures, gateway token mishandling, and security configurations left wide open by default settings.
Beginner OpenClaw Tutorial: Prerequisites and Preparation
Before running the auto-installer, you need four components in place. Skipping any of these triggers mid-installation failures that force complete restarts.
MacOS users face a hidden trap. The standard curl command fails on Apple Silicon without manual intervention because Xcode command line tools aren’t bundled with modern Mac operating systems. The official OpenClaw documentation doesn’t mention this prerequisite, but tutorial creators consistently pause their recordings at the 12-minute mark to address permission denied errors.
Windows and Linux users can proceed directly to API key generation. Mac users must install Xcode tools first, then Homebrew, which adds 12-14 minutes to the advertised timeline. This isn’t a minor inconvenience it’s the difference between a smooth 20-minute setup and a 40-minute troubleshooting session.
Step 1: Install Required System Dependencies
Open Terminal and run this command to install Xcode command line tools:
xcode-select –install
A dialog box will appear asking you to confirm the installation. Click Install and wait 8-12 minutes depending on your connection speed. You’ll know it’s complete when Terminal returns to a standard prompt without error messages.
Next, install Homebrew if you haven’t already. Visit brew.sh and copy the installation command, or run:
/bin/bash -c “$(curl -fsSL https://raw.githubusercontent.com/Homebrew/install/HEAD/install.sh)”
Homebrew installation takes another 3-5 minutes and requires your Mac password. The installer will pause at several points to download components this is normal behavior, not a freeze.
Windows users need Windows Subsystem for Linux (WSL2) or Docker Desktop installed before proceeding. Linux users should verify curl and bash are present by running which curl and which bash. Both should return file paths, not “not found” messages.
Step 2: Generate and Store Provider API Keys
OpenClaw requires API access to language model providers. The most common choice is Anthropic’s Claude, which operates on token-based pricing rather than monthly subscriptions. You’ll need an API key before starting the installer to avoid a forced pause at the 7:30 minute mark that every tutorial demonstrates.
Visit console.anthropic.com and create an account if you don’t have one. Navigate to API Keys in the left sidebar and click Create Key. Copy the key immediately Anthropic only displays it once.
Store this key in a temporary text file on your desktop labeled “openclaw-keys.txt” for easy access during installation. You’ll paste it into the Terminal User Interface when prompted. Losing this key doesn’t compromise security (you can regenerate it), but it does mean repeating the entire configuration process.
If you plan to use Google Workspace integrations, you’ll also need OAuth credentials from Google Cloud Console. This step can wait until after core installation, but setting it up now saves 15 minutes later. The consent screen configuration is notorious for looping beginners through multiple authentication attempts.
How to Set Up OpenClaw: The Core Installation Steps
With prerequisites handled, the actual installation takes under 5 minutes. The auto-detect installer analyzes your operating system and applies what the documentation calls “safe defaults.” These defaults prioritize getting you to a working chat interface quickly, not securing that interface against local network threats.
Step 3: Execute the Auto-Installer
Run this single command in Terminal:
curl -fsSL https://install.openclaw.ai | bash
The installer launches a Terminal User Interface (TUI) that walks through configuration options. For beginners, select QuickStart when prompted. This mode auto-configures the gateway, installs core tools like web search and browser control, and starts the local server.
You’ll see scrolling text as packages download and install. The process pauses twice: once to ask which language model provider you’re using (select Anthropic/Claude), and again to request your API key. Paste the key you saved earlier and press Enter.
The installer completes with a message displaying your local access URL (typically http://localhost:3000) and a gateway token. This is the critical moment.
Step 4: Secure Your Gateway Token
The auto-generated gateway token appears once in your terminal window. Copy it immediately and add it to your openclaw-keys.txt file. Tutorial creators emphasize this with bright red highlight boxes for good reason losing this token forces a complete reconfiguration because OpenClaw doesn’t store it in plaintext anywhere on your system.
The token looks like a long random string: gw_a8f3k2m9… (truncated for security). You’ll need it to connect Telegram integrations and access the web interface from remote devices.
Open your browser and navigate to the localhost URL provided. If you see a login screen asking for the gateway token, paste it in. If you see the chat interface directly, the QuickStart successfully auto-authenticated your browser session.
Secure OpenClaw Configuration: Fixing Default Vulnerabilities
The QuickStart installer’s “safe defaults” leave two major security holes open. The gateway binds to all network interfaces by default, meaning any device on your local network can attempt to connect. Docker deployments run with write permissions enabled, creating persistence risks if the sandbox is breached.
These aren’t theoretical vulnerabilities. Microsoft’s security research team published a February 2026 analysis documenting how default OpenClaw configurations expose identity tokens and allow lateral movement within home networks. The fixes take 10 minutes to implement and prevent unauthorized access without breaking functionality.
Step 5: Lock Down Localhost Binding
Open the OpenClaw configuration file. The installer places it at ~/.openclaw/config.yaml on Mac and Linux, or %USERPROFILE%\.openclaw\config.yaml on Windows.
Find the gateway section (usually near the top) and locate the bind parameter. The default looks like this:
gateway:
bind: “0.0.0.0”
port: 3000
Change 0.0.0.0 to 127.0.0.1:
gateway:
bind: “127.0.0.1”
port: 3000
This restricts the gateway to accept connections only from your local machine. Devices on your home network can no longer see or attempt to connect to your OpenClaw instance. Save the file and restart the gateway by running openclaw restart in Terminal.
Mac users on Apple Silicon (M1, M2, M3, M4, M5 chips) should also disable Bonjour broadcasts, which advertise the service to other devices via mDNS. Add this line to your shell profile (usually ~/.zshrc):
export OPENCLAW_DISABLE_BONJOUR=1
Reload your shell with source ~/.zshrc and restart OpenClaw again.
Step 6: Implement Docker Read-Only Modes
If you’re running OpenClaw via Docker (recommended for VPS deployments), add the read-only flag to prevent persistence if the sandbox is breached. The standard Docker run command from the documentation looks like this:
docker run -d –name openclaw openclaw/openclaw:latest
Modify it to include security flags:
docker run -d –name openclaw –read-only –security-opt=no-new-privileges openclaw/openclaw:latest
The read-only flag prevents the container from writing to its filesystem, blocking malware persistence. The no-new-privileges option stops processes inside the container from gaining additional permissions through setuid binaries.
You’ll also want to run as a non-root user. Add –user 1000:1000 to the command (adjust the UID/GID to match your system). This prevents the container from having root access to the host system even if an attacker escapes the sandbox.
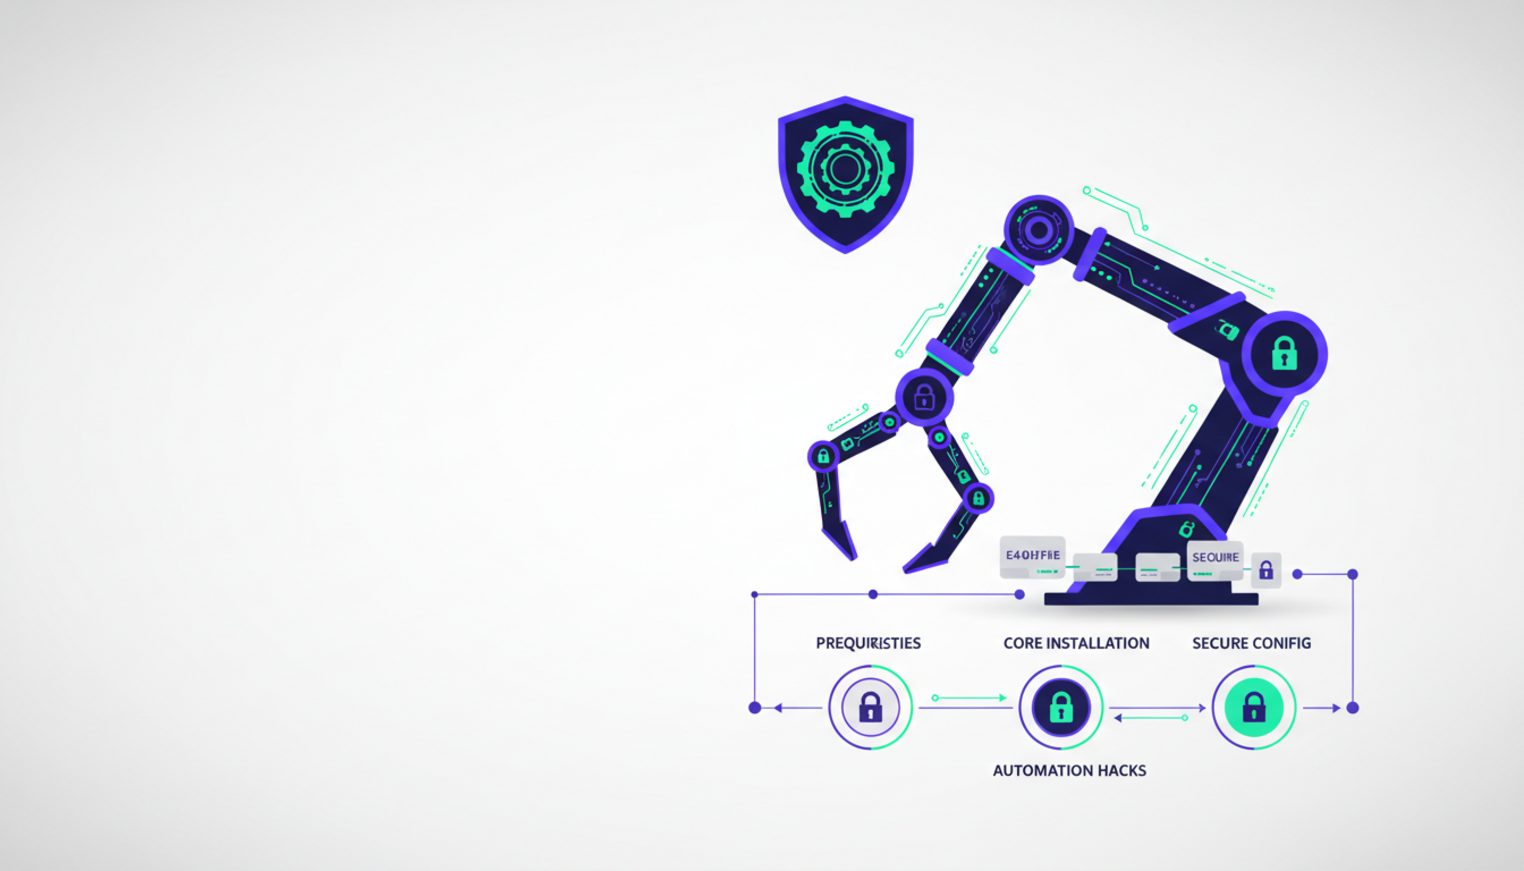
OpenClaw Productivity Hacks: Automating Workflows for 24/7 Uptime
The difference between a local install and a VPS deployment is the difference between a tool you use and a system that works for you. Local installations crash when your laptop sleeps, lose state when you restart, and require manual intervention to execute scheduled tasks.
VPS deployments with Docker turn OpenClaw into a proactive automation engine. The agent runs continuously, handling background tasks like email sorting, calendar management, and scheduled web scraping without your involvement. Tutorial creators stress-tested a VPS instance for 150 hours of continuous operation the equivalent of running 24/7 for six days without intervention.
This isn’t about uptime for its own sake. It’s about reclaiming hours of manual work.
Deploying on a Virtual Private Server (VPS)
A VPS costs $5-20 per month depending on your provider and resource needs. DigitalOcean offers a one-click OpenClaw installer that handles Docker configuration automatically. Linode and Vultr provide similar options with slightly different pricing structures.
The setup process mirrors local installation with one key difference: you’ll access the web interface via your VPS’s IP address instead of localhost. After running the installer on your VPS, note the public IP (something like 192.0.2.146) and navigate to http://192.0.2.146:3000 in your browser.
You’ll need to configure firewall rules to restrict access. Most VPS providers include a web-based firewall interface. Create a rule that allows TCP traffic on port 3000 only from your home IP address. This prevents random internet users from discovering your OpenClaw instance through port scanning.
For remote access from multiple locations, use Tailscale instead of exposing the port publicly. Tailscale creates a private network between your devices and the VPS, encrypting all traffic and bypassing the need for public port exposure. Install Tailscale on both your VPS and local machine, then access OpenClaw via the Tailscale IP (typically in the 100.x.x.x range).
Integrating Telegram for Remote Execution
Telegram integration lets you interact with OpenClaw from your phone without opening a browser or connecting to your VPS. The setup requires your saved gateway token and takes about 5 minutes.
In the OpenClaw web interface, navigate to Settings, then Integrations. Click Add Integration and select Telegram from the list. You’ll see instructions to message the OpenClaw Telegram bot and paste your gateway token.
Open Telegram and search for @OpenClawBot (the exact name varies by deployment). Start a conversation and send the message /start. The bot responds with a prompt asking for your gateway token. Paste the token you saved during installation.
The bot confirms the connection and you can immediately start sending commands. Try /chat What’s the weather in Seattle? to verify it works. The bot routes your message to your OpenClaw instance, which processes it using your configured language model and returns the response in Telegram.
This setup means you can trigger automations, check on scheduled tasks, or ask questions from anywhere without exposing your VPS to the public internet. The Telegram bot acts as a secure proxy between your phone and your private OpenClaw instance.
Connecting Google Workspace Tools
Google Workspace integration is where OpenClaw transitions from chat assistant to genuine automation platform. The agent can read and send emails, manage calendar events, and access Google Drive documents all through natural language commands.
The setup process hits a notorious wall called the consent screen configuration. Google requires you to register your OpenClaw instance as an OAuth application before granting access to your personal data. This makes sense from a security perspective but confuses beginners because the error messages are vague.
Start by visiting console.cloud.google.com and creating a new project. Name it something memorable like “OpenClaw Personal.” Navigate to APIs & Services, then OAuth consent screen. Select External (unless you have a Google Workspace organization account) and click Create.
Fill in the required fields: application name (OpenClaw), user support email (your email), and developer contact information (your email again). You can leave most optional fields blank. Click Save and Continue.
On the Scopes page, click Add or Remove Scopes. Search for Gmail, Calendar, and Drive, then select the read/write scopes for each. These typically have names like https://www.googleapis.com/auth/gmail.modify. Click Update and Save and Continue.
The Test Users page requires you to add your own email address. Google only allows your OpenClaw instance to access accounts you explicitly list here. Add your email and click Save and Continue.
Now create OAuth credentials. Go to Credentials in the left sidebar, click Create Credentials, and select OAuth client ID. Choose Web application as the type. Add http://localhost:3000/auth/google/callback to the Authorized redirect URIs field (adjust the port if you changed it during installation).
Click Create and copy the Client ID and Client Secret. Return to OpenClaw’s web interface, navigate to Settings, then Integrations. Click Add Integration and select Google Workspace. Paste the Client ID and Client Secret, then click Authorize.
Your browser redirects to Google’s consent screen asking you to grant permissions. Click Allow. If you see an error saying “This app isn’t verified,” click Advanced, then “Go to OpenClaw Personal (unsafe).” This warning appears because you haven’t submitted your OAuth app for Google’s verification process which isn’t necessary for personal use.
After granting permissions, you’re redirected back to OpenClaw with a success message. Test the integration by asking OpenClaw to “Check my calendar for tomorrow” or “Send an email to myself with subject Test.” The agent should execute these commands without errors.
Common OpenClaw Setup Errors: Troubleshooting and Fixes
Three errors account for most beginner setup failures. Each has a direct solution that takes under 5 minutes to implement once you know what to look for.
Error 1: “Permission Denied” on Apple Silicon
This error appears during the curl installation command on Mac. The terminal displays “permission denied” or “command not found: curl” even though curl is supposedly built into MacOS.
The root cause is missing Xcode command line tools. MacOS doesn’t bundle these tools by default on M1 and newer chips. Stop the curl script by pressing Control+C, then run xcode-select –install. Wait for the installation to complete (8-12 minutes), then retry the OpenClaw installer.
If you’ve already installed Xcode tools but still see the error, verify Homebrew paths are correctly set. Run brew doctor and follow any recommendations it provides. The most common issue is Homebrew installed in /opt/homebrew on Apple Silicon but your shell looking in /usr/local/bin.
Error 2: Unauthorized Access on Web Interface
You navigate to localhost:3000 and see either a blank page, a connection refused error, or a login screen that rejects your gateway token. This happens when the token is mistyped, the gateway isn’t running, or localhost binding is misconfigured.
First, verify the gateway is actually running. Open Terminal and run openclaw status. You should see “Gateway: Running” in the output. If it says “Gateway: Stopped,” run openclaw start and wait 10 seconds before refreshing your browser.
If the gateway is running but you still can’t connect, check the config.yaml file. The bind parameter must be set to either “127.0.0.1” or “0.0.0.0” not blank, not commented out with a # symbol. Save any changes and restart with openclaw restart.
For token rejection errors, regenerate the token by running openclaw gateway token –regenerate. This displays a new token in Terminal. Copy it, paste it into the web interface login screen, and save it to your openclaw-keys.txt file to prevent future lockouts.
Error 3: Google Workspace Integration Loops
You attempt to authorize Google Workspace and end up in an endless loop of consent screens, redirect errors, or “invalid redirect URI” messages. This is the most frustrating error because it feels like you’re following the instructions correctly but Google keeps rejecting your authorization.
The problem is almost always a mismatch between the redirect URI you configured in Google Cloud Console and the one OpenClaw is actually using. Google is extremely strict about these URIs even a trailing slash difference causes rejection.
Return to Google Cloud Console, navigate to Credentials, and click on your OAuth client ID. Look at the Authorized redirect URIs list. It should contain exactly http://localhost:3000/auth/google/callback (or your VPS IP if deploying remotely).
If you’re using a VPS, the URI should be http://YOUR_VPS_IP:3000/auth/google/callback. If you’re using Tailscale, it should be http://YOUR_TAILSCALE_IP:3000/auth/google/callback. The protocol (http vs https), port, and path must match exactly what OpenClaw sends during authorization.
After correcting the URI, wait 5 minutes for Google’s systems to propagate the change, then retry the authorization flow from OpenClaw’s web interface. The consent screen should complete successfully this time and redirect you back to OpenClaw with a green success banner.
Using openclaw doctor is the fastest way to automatically identify permission tightening requirements without digging through raw logs. Run it after any configuration change to catch misconfigurations before they cause runtime errors.
Next Steps: Choosing Your Deployment Path
Your next move depends on what you need from OpenClaw. If you only need occasional coding help or want to experiment with AI agents without ongoing costs, stick to the hardened local install you just completed. The security configurations you implemented prevent network exposure while maintaining full functionality for interactive use.
If you want a true automated assistant managing emails, schedules, and background tasks, migrate to the VPS Docker setup immediately. The time investment is identical to what you just completed 40 minutes including troubleshooting but the return is continuous operation that reclaims hours of manual task time weekly.
For local installs, your next priority is configuring tool allow/deny lists to prevent the agent from accessing sensitive system resources. For VPS deployments, focus on setting up automated backups of your config.yaml and integration credentials so a server failure doesn’t force complete reconfiguration.
Either path gives you a working, secure OpenClaw environment. The difference is whether you want an assistant you talk to or a system that works while you sleep.
